
Controller Essentials: Understanding Laravel’s Create/Store Methods
How do you insert a new record into the database? You can use tinker like we’ve been doing so far, but realistically we need to use a form. The user should see a blank form first and then click on the Submit button. The data should be sent over to another method in the controller that will help validate the data and send it to our PersonalCar model for insertion into the database.
Create
The first thing that you need to see is a form. We have a route for it: it’s the route to the create method.
Route::prefix('/personalcars')->group(function() {
    Route::get('/create',    [PersonalCarController::class, 'create']);
});
The create method in our PersonalCarController will return the form to the user.
<?php

namespace App\Http\Controllers;

use App\Models\PersonalCar;
use Illuminate\Http\Request;

class PersonalCarController extends Controller
{
    // ...

    /**
     * Show the form for creating a new resource.
     */
    public function create()
    {
        return view('personalcars/create', [
            'title' => 'Personal Cars'
        ]);
    }

    // ...
}
We’ll create a new resources/views/personalcars/create.blade.php file and add our form.
<x-layouts.app title="{{ $title }}">
    <div class="flex bg-white mt-12">
        <div class="flex justify-center items-center w-full">
            <div class="w-1/2 bg-white rounded shadow-2xl p-8 m-4">
                <h1 class="block w-full text-center text-gray-800 text-2xl font-bold mb-6">Add New Car</h1>
                <form action="/" method="post">
                    <div class="flex flex-col mb-4">
                        <label class="mb-2 font-bold text-lg text-gray-900" for="year">Year</label>
                        <input class="border py-2 px-3 text-grey-800" type="number" name="year" id="year" min="1920" max="{{ date('Y') + 1 }}" placeholder="2003">
                    </div>
                    <div class="flex flex-col mb-4">
                        <label class="mb-2 font-bold text-lg text-gray-900" for="make">Make</label>
                        <input class="border py-2 px-3 text-grey-800" type="text" name="make" id="make" placeholder="Chevy">
                    </div>
                    <div class="flex flex-col mb-4">
                        <label class="mb-2 font-bold text-lg text-gray-900" for="model">Model</label>
                        <input class="border py-2 px-3 text-grey-800" type="text" name="model" id="model" placeholder="Corvette">
                    </div>
                    <div class="flex flex-col mb-4">
                        <label class="mb-2 font-bold text-lg text-gray-900" for="password">Transmission</label>
                        <div class="flex items-center mb-4">
                            <input id="is-manual-1" type="radio" name="is_manual" value="1" class="h-4 w-4 border-gray-300 focus:ring-2 focus:ring-blue-300" checked>
                            <label for="is-manual-1" class="text-sm font-medium text-gray-900 ml-2">
                                Manual
                            </label>
                        </div>
                        <div class="flex items-center mb-4">
                            <input id="is-manual-2" type="radio" name="is_manual" value="0" class="h-4 w-4 border-gray-300 focus:ring-2 focus:ring-blue-300">
                            <label for="is-manual-2" class="text-sm font-medium text-gray-900 ml-2">
                                Automatic
                            </label>
                        </div>
                    </div>
                    <div class="flex flex-col mb-4">
                        <label class="mb-2 font-bold text-lg text-gray-900" for="exterior_color">Exterior Color</label>
                        <input class="border py-2 px-3 text-grey-800" type="text" name="exterior_color" id="exterior_color" placeholder="Blue">
                    </div>
                    <div class="flex flex-col mb-4">
                        <label class="mb-2 font-bold text-lg text-gray-900" for="purchase_amount">Purchase Amount (in USD)</label>
                        <input class="border py-2 px-3 text-grey-800" type="text" name="purchase_amount" id="purchase_amount" placeholder="9532.57">
                    </div>
                    <div class="flex flex-col mb-4">
                        <label class="mb-2 font-bold text-lg text-gray-900" for="current_value">Current Value (in USD)</label>
                        <input class="border py-2 px-3 text-grey-800" type="text" name="current_value" id="current_value" placeholder="95532.57">
                    </div>
                    <div class="flex flex-col mb-4">
                        <label class="mb-2 font-bold text-lg text-gray-900" for="sales_amount">Sales Amount (in USD)</label>
                        <input class="border py-2 px-3 text-grey-800" type="text" name="sales_amount" id="sales_amount" placeholder="0.00">
                    </div>
                    <div class="flex flex-col mb-4">
                        <label class="mb-2 font-bold text-lg text-gray-900" for="date_purchased">Date Purchased</label>
                        <input class="border py-2 px-3 text-grey-800" type="date" name="date_purchased" id="date_purchased">
                    </div>
                    <div class="flex flex-col mb-4">
                        <label class="mb-2 font-bold text-lg text-gray-900" for="date_sold">Date Sold</label>
                        <input class="border py-2 px-3 text-grey-800" type="date" name="date_sold" id="date_sold">
                    </div>
                    <div class="flex flex-col mb-4">
                        <div class="mb-8">
                            <label class="mb-2 font-bold text-lg text-gray-900 block" for="file">Select Image</label>
                            <input type="file" name="file" id="file" class="mb-2 text-lg text-gray-900" />
                        </div>
                    </div>

                    <button class="block bg-green-400 hover:bg-green-600 text-white uppercase text-lg mx-auto p-4 rounded" type="submit">Save Car</button>
                </form>
            </div>
        </div>
    </div>
</x-layouts.app>
This will generate a nice form for us. If we visit our route, we’ll see the following.
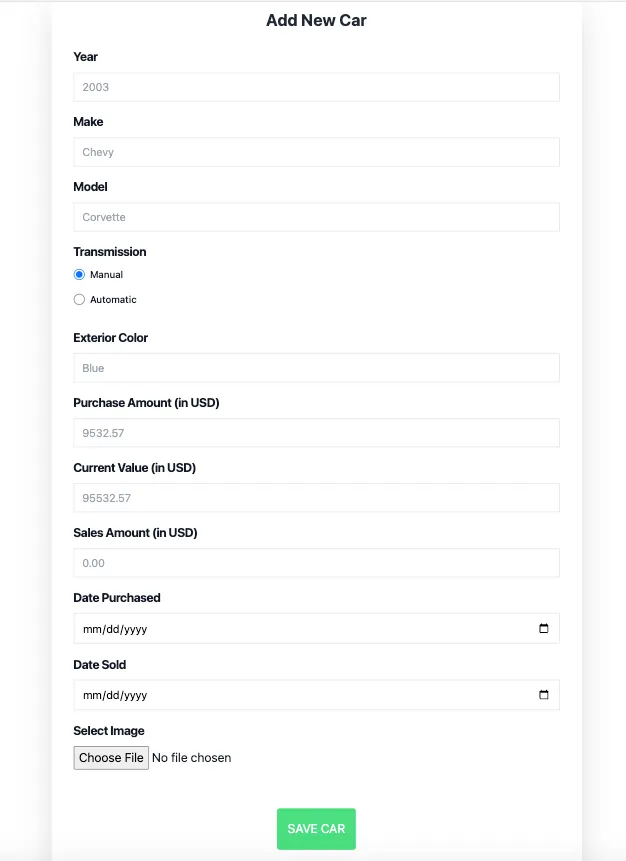
The user can now fill out their details and click on the Save Car button. But where does that go? Well it should go to our store route.
In order to make this form easily accessible, let’s add a New Car button to our index view. I’ll add the following code to the bottom of our index view.
<a href="/personalcars/create">
    <button class="block bg-green-400 hover:bg-green-600 text-white uppercase text-lg mx-auto p-4 rounded" type="submit">Add New Car</button>
</a>
The entire index view now looks like this.
<x-layouts.app title="{{ $title }}">
    <div class="flex bg-white mt-12" style="height:600px;">
        <div class="items-center text-center lg:text-left px-8 md:px-12 lg:w-full">
            <div class="relative overflow-x-auto">
                <table class="w-full text-sm text-left text-gray-500 dark:text-gray-400">
                    <thead class="text-xs text-gray-700 uppercase bg-gray-50 dark:bg-gray-700 dark:text-gray-400">
                        <tr>
                            <th scope="col" class="px-6 py-3">
                                Year
                            </th>
                            <th scope="col" class="px-6 py-3">
                                Make
                            </th>
                            <th scope="col" class="px-6 py-3">
                                Model
                            </th>
                            <th scope="col" class="px-6 py-3">
                                Exterior Color
                            </th>
                            <th scope="col" class="px-6 py-3">
                                Current Value
                            </th>
                            <th scope="col" class="px-6 py-3">
                                View
                            </th>
                        </tr>
                    </thead>
                    <tbody>
                        @foreach($cars as $car)
                            <tr class="bg-white border-b dark:bg-gray-800 dark:border-gray-700">
                                <th scope="row" class="px-6 py-4 font-medium text-gray-900 whitespace-nowrap dark:text-white">
                                    {{ $car->year }}
                                </th>
                                <td class="px-6 py-4">
                                    {{ $car->brand->name }}
                                </td>
                                <td class="px-6 py-4">
                                    {{ $car->model->name }}
                                </td>
                                <td class="px-6 py-4">
                                    {{ $car->exterior_color }}
                                </td>
                                <td class="px-6 py-4">
                                    {{ $car->current_value }}
                                </td>
                                <td class="px-6 py-4">
                                    <a href="/personalcars/{{ $car->id }}">
                                        Show Car
                                    </a>
                                </td>
                            </tr>
                        @endforeach
                    </tbody>
                </table>
            </div>
        </div>
    </div>
    <a href="/personalcars/create">
        <button class="block bg-green-400 hover:bg-green-600 text-white uppercase text-lg mx-auto p-4 rounded" type="submit">Add New Car</button>
    </a>
</x-layouts.app>
If we visit our index page, we should see the button at the bottom of the screen.

Store
The store route is already defined in our routes file.
Route::prefix('/personalcars')->group(function() {
    Route::post('/', [PersonalCarController::class, 'store']);
});
That means that if we send a post request to our /personalcars/ route, we should be able to access the data. First, we need to make a modification in our create view. Specifically, we need to add our /personalcars/ route to the form action.
<x-layouts.app title="{{ $title }}">
    <div class="flex bg-white mt-12">
        <div class="flex justify-center items-center w-full">
            <div class="w-1/2 bg-white rounded shadow-2xl p-8 m-4">
                <h1 class="block w-full text-center text-gray-800 text-2xl font-bold mb-6">Add New Car</h1>

                <form action="/personalcars/" method="post">
                    <!-- Form Fields -->
                </form>


            </div>
        </div>
    </div>
</x-layouts.app>
Without knowing what the $request argument is, let’s try to dd() it in our store method.
<?php

namespace App\Http\Controllers;

use App\Models\PersonalCar;
use Illuminate\Http\Request;

class PersonalCarController extends Controller
{
    // ...

    /**
     * Show the form for creating a new resource.
     */
    public function create()
    {
        return view('personalcars/create', [
            'title' => 'Personal Cars'
        ]);
    }

    /**
     * Store a newly created resource in storage.
     *
     * @param  \Illuminate\Http\Request  $request
     * @return \Illuminate\Http\Response
     */
    public function store(Request $request)
    {
        dd($request);
        // get data from form
        // validate data
        // insert data into table
        // return message that insertion was successful
    }

    // ...
}
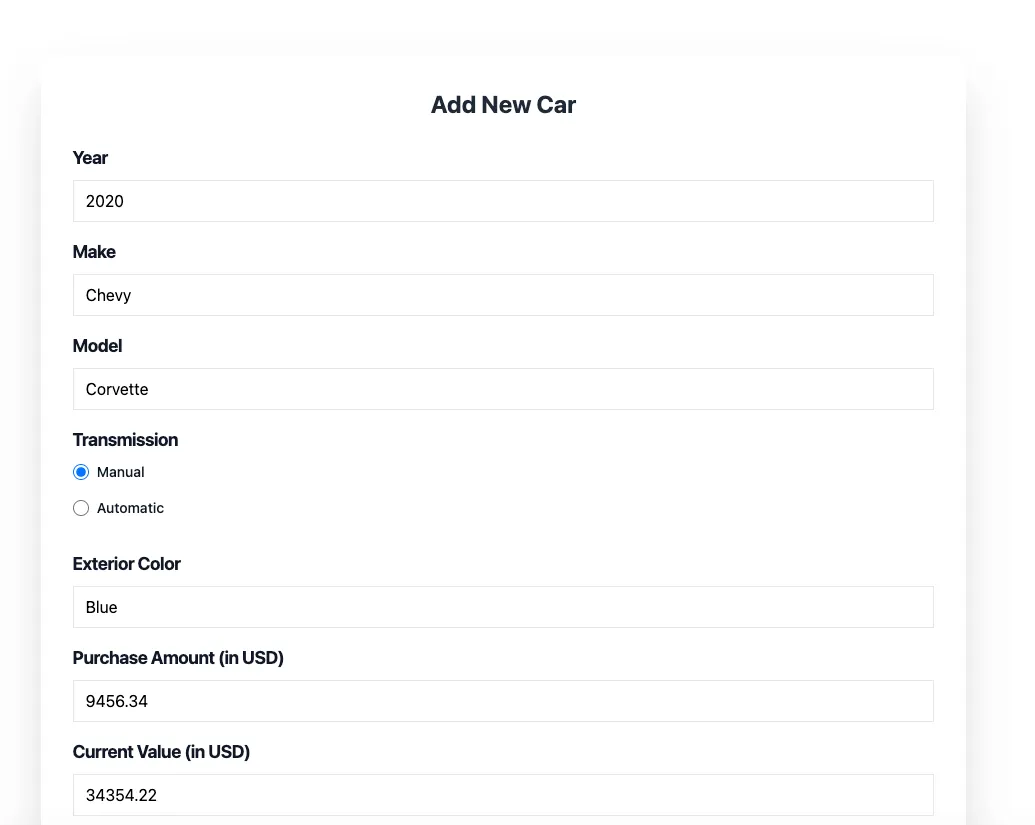
If we fill some data out in our form and click submit, we will get a nice surprise.

Page Expired? What this really means is that we haven’t accounted for Cross Site Request Forgery protection. We’re going to cover this concept fully, but at a high glance, CSRF guards the user against malicious exploits. We simply need to add a @csrf token into our form. Thankfully blade has a component for it.
<x-layouts.app title="{{ $title }}">
    <div class="flex bg-white mt-12">
        <div class="flex justify-center items-center w-full">
            <div class="w-1/2 bg-white rounded shadow-2xl p-8 m-4">
                <h1 class="block w-full text-center text-gray-800 text-2xl font-bold mb-6">Add New Car</h1>
                <form action="/personalcars/" method="post">
                    @csrf

                    <!-- Form fields -->
                </form>
            </div>
        </div>
    </div>
</x-layouts.app>
If we resubmit our form right now, we should see a data dump.
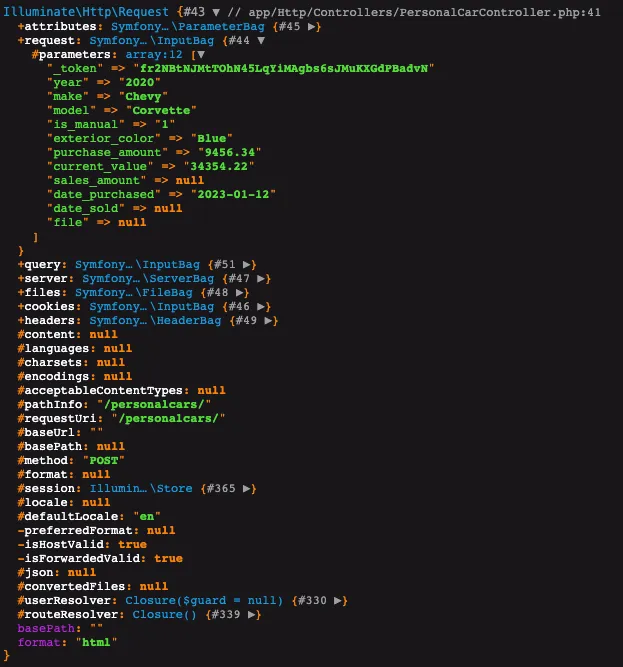
All of our data is now inside of our request->parameters array. We can access those arguments as properties.
For example,
public function store(Request $request)
{
    dd($request->current_value);
    // get data from form
    // validate data
    // insert data into table
    // return message that insertion was successful
}
The code above will output:
"34354.22" // app/Http/Controllers/PersonalCarController.php:41
Now that we know that we have all of the data, besides images, we can insert it into the database.
The steps to insert are as follows:
- Create a new
PersonalCarBrandor return it if it already exists. - Create a new
PersonalCarModelor return it if it already exists. - Create a new
PersonalCar - For each of the fields in it, add the data. This includes
year,is_manual,exterior_color,purchase_amount,current_value,sales_amount,date_purchased, anddate_sold. - Associate the
PersonalCarBrandandPersonalCarModelto thePersonalCar. - Save the
PersonalCar.
<?php

namespace App\Http\Controllers;

use App\Models\PersonalCar;
use App\Models\PersonalCarBrand;
use App\Models\PersonalCarModel;
use Faker\Provider\Person;
use Illuminate\Http\Request;

class PersonalCarController extends Controller
{

    // ...

    /**
     * Store a newly created resource in storage.
     *
     * @param  \Illuminate\Http\Request  $request
     * @return \Illuminate\Http\Response
     */
    public function store(Request $request)
    {
        // validate data

        $brand = PersonalCarBrand::firstOrCreate([
            'name' => $request->make,
        ], [
            'slug' => str_replace(" ", "-", strtolower($request->make))
        ]);

        $model = PersonalCarModel::firstOrCreate([
            'name' => $request->model,
        ], [
            'slug' => str_replace(" ", "-", strtolower($request->model))
        ]);

        $car = new PersonalCar;
        $car->year            = $request->year;
        $car->brand()->associate($brand);
        $car->model()->associate($model);
        $car->is_manual       = $request->is_manual;
        $car->exterior_color  = $request->exterior_color;
        $car->purchase_amount = $request->purchase_amount;
        $car->current_value   = $request->current_value;
        $car->sales_amount    = $request->sales_amount == 0 ? 0 : $request->sales_amount;
        $car->date_purchased  = $request->date_purchased;
        $car->date_sold       = $request->date_sold;

        $car->save();

        return redirect()->to('/personalcars/');

        // return message that insertion was successful
    }

    // ...
}
Quite a bunch of stuff to dissect and we’ll go over it all in detail in future articles. For now, know that firstOrCreate accepts two array values. The first one is what Laravel should look for in the table (the unique value). If a unique value is found, it’s returned. If it’s not found, combine the two arrays and insert the data into the database. That’s why we have name in one array and slug in another.
$brand = PersonalCarBrand::firstOrCreate([
    'name' => $request->make,
], [
    'slug' => str_replace(" ", "-", strtolower($request->make))
]);
To add the foreign key into our personal_cars table, we need to use the associate method.
$car->brand()->associate($brand);
This now creates the foreign id inside of our personal_cars table. Finally, the save() method saves the whole form.
We’ll redirect the user back to the index page after successful insertion.
return redirect()->to('/personalcars/');
Test
I’ll insert a new 2024 Corvette Z06 into my table. It pains me that it’s only automatic, but what can you do.
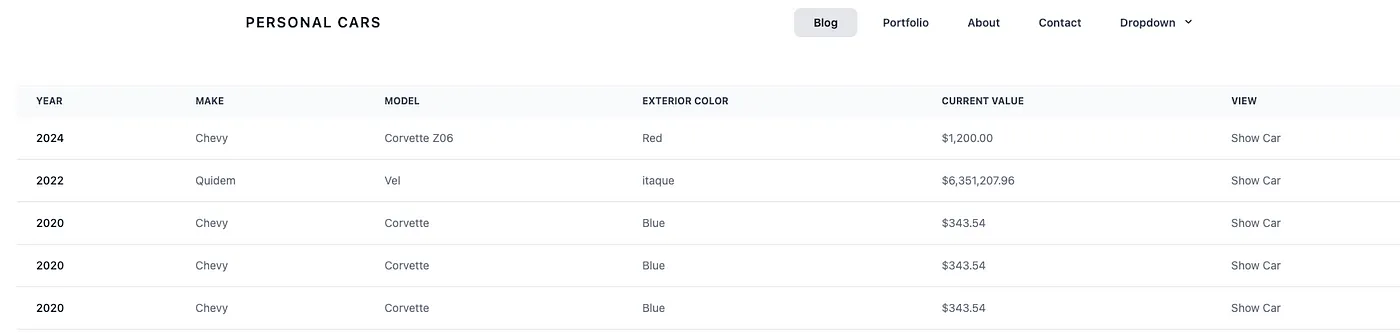
We can see that it was successfully inserted and that we have been redirected back to the index page.
Even though we’ve spent close to 40 articles talking about Laravel, there are still so many little nuances that we have yet to cover (as was evident in this article). We’ll tackle those over time but I did want to illustrate to those individuals that believe that a language/framework can be mastered in a few days that it can’t.
There are a few more steps left before I’m satisfied with the results of even this article.
- Display success or error message.
- Fix purchase amount, sales amount, and current value, since we need to store those as pennies. We’re currently inserting them as dollar values.
- Validate data before insertion
After that, we’ll tackle images. See you next time.
Laravel Series
Continue your Laravel Learning.

Understanding the Show Method for Data Display
Laravel – P41: CMP – Controller Show
Learn how to use Laravel’s Show Method in controllers to effectively display individual data records. A comprehensive guide for streamlining your app.
Controller Essentials: Understanding Laravel’s Create/Store Methods
Laravel – P42: CMP – Insert Data
Explore Laravel’s Create/Store methods in controllers for seamless data creation and storage. A guide to efficiently handling form submissions in Laravel.

Mastering Form Validation in Laravel Controllers
Laravel – P43: CMP – Form Validation
Learn how to implement form validation in Laravel controllers to ensure data integrity and improve user input handling in your applications.